
Nowadays, I’m building more and more services using the MASH stack: Mummy, Alpine.js, SQLite, and htmx. This stack provides a performant, pleasant, and straightforward way to develop web applications.
In my first attempt, Findsight, the frontend HTML was generated using server-side-rendered karax. Note that this was not utilizing the karax reactive framework, but its DOM-builder DSL. However, the Alpine component code, state management, various app startup code, and htmx event handlers were all written using inline JS, which proved to be unwieldy as my projects grew.
In this article, we’ll explore how to use Nim as a full stack language for type safety and maintainability. We’ll build a complete example of frontend and backend code, which will demonstrate the important concepts to keep in mind when using Nim with Alpine.
Alpine Primer
Consider a single binding:
<span x-show="open">Content</span>
That’s fine, as we’re including the component property open by itself and there’s no active JS code in here. However, even a tiny component store violates this by including a JS object:
<div x-data="{ open: false }">
Or, staying with the same example, an event binding that contains code:
<button x-on:click="open = true">Expand</button>
Side note: x-on can be shortened to @.
These are smaller examples, but in a sufficiently complex app, the complexity of these little inline snippets grows with it.
Fortunately, Alpine provides a way to extract the component (x-data) into a standalone JS object. Here’s an example straight from the documentation:
<div x-data="dropdown">
    <button x-on:click="toggle">...</button>

    <div x-show="open">...</div>
</div>

<script>
    document.addEventListener('alpine:init', () => {
        Alpine.data('dropdown', () => ({
            open: false,

            toggle() {
                this.open = ! this.open
            }
        }))
    })
</script>
And x-bind enables the same for any template directive. Both approaches combined keep the HTML clean.
But now we’d have to write JavaScript, and I’d like to stay in Nim. Nim does have a JS backend, and there are just a few steps needed to create those components in pure Nim.
Frontend
First create a frontend directory. We’ll put all client side code in here, which is going to be compiled to JS from Nim, and then later minified and optimized.
Project Structure
.
├── frontend
│   ├── alpine.nim
│   ├── app.nimble
│   ├── app.nim
│   ├── components.nim
│   └── nim.cfg
The Nim config nim.cfg sets our backend, which is picked up by nimsuggest in VS Code to provide backend-relevant error checks:
backend:js
-d:release
It also forces a release build. Nim-compiled JS, depending on the libraries used, is extremely verbose and the debugging info that is generated is less useful in JS code. By compiling in release mode, we end up with more readable JS.
The resulting JS is still too large to ship directly to users, so we need to optimize it. For this, I’m using Terser, which is the best standalone optimizing minifier (esbuild and the Google Closure Compiler both have similar functionality, but are a less effective). Install it system wide via:
npm install -g terser
Or use npx to invoke it later without prior installation.
Now add it as a build task to app.nimble:
import strformat

bin           = @["app"]
backend       = "js"

requires "nim >= 2.0.0"

after build:
  exec &"terser --compress hoist_funs,keep_fargs=false,unsafe --mangle toplevel {bin[0]}.js -o {bin[0]}.dist.js"
Other than the default terser options, we enable:
- additional compression options
hoist_funs: hoists function declarationskeep_fargs=false: discards unused function arguments (breaks code which relies on Function.length)unsafe: enables all unsafe optimizations (which aren’t actually that unsafe)
- global name mangling (
toplevel) which enables terser to mangle some of the support functions that Nim emits for e.g. string formatting which would otherwise have quite long gensym names
These options are optimized for this use case and will be different if you’re working on a Nim-JS project that isn’t Alpine. For example, you wouldn’t use global name mangling for JS libraries. Since Alpine component code depends on object properties and methods, they’re unaffected by the mangling algorithm.
Component Contract
In components.nim, let’s define the type interface for both the component state (used with Alpine.data) and the behavior (used with x-bind):
import std / [
  dom
]

type
  DropDown* = ref object
    init*: proc()
    destroy*: proc()

    open*: bool
    toggle*: proc(msg: cstring)
    timer*: Interval
    counter*: cint

  DropButton* = ref object
    `type`* = "button"
    `@click`* {.exportc: "['$1']".}: proc()
    `disabled`* {.exportc: "[':$1']".}: proc(): bool
To break down what’s going on here:
std/dom gives us access to a lot of FFI types for interacting with the browser’s object implementations.
The object types are declared as ref, which is the default for JavaScript. Without ref, Nim will use copy semantics, and emit large helper functions for deep-copying, which are not required in this case.
DropDown holds the component state:
initanddestroyare object methods (in the JS sense) that are invoked by Alpine when the component is created and destroyedopenwill hold the current open/collapsed statetoggleis the method that will change theopenstate, and also demos parameter passing to object methodstimerdemos a component property that refers to a native browser type, in this case a time intervalcounteris another property that will be used later to explain object property access from within methods
DropButton holds the binding:
typeis an Alpine attribute that determines the DOM type of the bound element@click(orx-on:click) binds to the event (x-on)click:disabledis a direct attribute binding that maps the given DOM element attribute value to a component method/property
You may notice the exportc pragmas on the last two properties. This is a necessary workaround for Nim’s name mangling. While some identifiers in Nim can be escaped with `name`, it’s not nearly as flexible as JS’s ['name'], so we have to cheat a bit with exportc’s built-in string formatting:
- For
@click, the"['$1']"format produces['@click'] - For
disabled, the[':$1']format produces[':disabled']
Alpine Abstraction
We’re almost ready to dive into the component implementation, but we need a few FFI helpers first. In alpine.nim:
proc registerComponent*(name: cstring, component: pointer)
  {.importjs: "Alpine.data(#, #)".}

proc bindElement*(binding: cstring, actions: pointer)
  {.importjs: "Alpine.bind(#, #)".}

proc env*[T](fn: (proc()), bar: T): (proc())
  {. importjs: "(#).bind(#)" .}

template this*(T: typedesc) =
  var this {.importc, nodecl, inject.}: T
registerComponentandbindElementmap to the respective Alpine functionsenvis a mapping of JavaScript’sbindfunction, which allows a caller to set the innerthis- this may be confusing at first but is required later as we get into closures over object instances from within methodsthisallows us to make Nim aware of the implicitthisin a method, and give it a strong type to makenimsuggestand compiler messages more helpful.importcandinjectensure that the code emitted by Nim refers tothisliterally
Component Implementation: State
In app.nim, we’ll place the actual implementation, starting with the component state and methods:
import std / [
  dom,
  strformat
]

import alpine
import components

proc dropdown(initialOpenState = false): DropDown =
  DropDown(
    init: (proc() =
      this DropDown

      this.timer = setInterval(
        (proc() =
          this DropDown
          inc this.counter
          echo &"Counter is now at {this.counter}"
        ).env(this), # explicit binding
        1_000
      )

      echo "Component initialized and timer started"
    ),

    destroy: (proc() =
      this DropDown
      clearInterval(this.timer)
    ),

    open: initialOpenState,

    toggle: (proc(msg: cstring) =
      this DropDown
      this.open = not this.open
      echo &"Parameter passed to toggle: {msg}"
    )
  )
There’s a lot more behavior in here than required for a normal dropdown, mostly because I want to show you how to implement other common patterns as well. If you understand what’s happening in this component, you’ll be able to create components of virtually any complexity.
Let’s start with the proc signature:
proc dropdown(initialOpenState = false): DropDown;
Alpine.data (see the example at the beginning of this article) expects a function, which returns a component: a JS object with methods. This is that function. But Alpine also allows parameter passing, usually used for initial state. Here we receive a boolean that indicates the initial state of the dropdown and later copy this into the open property.
All other properties of the Dropdown component are methods. They’re declared inline for brevity, but that is not required. All of them open with this Dropdown, which declares the Nim identifier this with the given type.
In init, on component creation, the timer property is initialized with a new interval timer using the JS function setInterval. Here we have to be careful with scoping. We need to ensure that the inline proc passed to setInterval closes over the correct this. We can’t use this Dropdown on its own in the timer proc, because it is not invoked from the Alpine environment, but from the browser timer callback. Instead, we need to explicitly close over the outer this. There are two ways to do this:
- use the
envbinding we declared before as shown here - this will create a new function that wraps the inner function in a closure environment with the suppliedthisvalue - declare a new variable in the method that the callback can close over
For the second variant, we’d have to add a line like var that = this below the this Dropdown in the init proc body, and then refer to that instead of this from the timer callback proc. Personally I consider env to be a cleaner way of achieving this.
Other than that, the init method is simple: create a timer that keeps incrementing the counter and print new values to the console (echo becomes console.log). destroy ensures the timer is deregistered.
toggle is the core functionality of flipping the dropdown’s internal state. It also demos the passing of parameters to component methods.
Component Implementation: Binding
The last thing we have to implement on the frontend is the binding, to keep the HTML as clean as possible:
proc dropbutton(): DropButton =
  DropButton(
    `@click`: (proc() =
      this DropDown
      this.toggle("boo!")
    ),

    `disabled`: (proc(): bool =
      this DropDown
      return this.counter > 10
    )
  )
On a mouse click event, the toggle method is invoked with a parameter. After the counter reaches 11 (so after 10s), the toggle button will be disabled.
Finally, we register the component:
document.addEventListener("alpine:init", proc(e: Event) =
  registerComponent("dropdown", dropdown)
  bindElement("dropbutton", dropbutton)
)
Building the Frontend
A simple nimble build in frontend/ now produces two files:
-rw-r--r--@ 1 turbo  staff    11K Dec 29 23:43 app.dist.js
-rw-r--r--@ 1 turbo  staff    34K Dec 21 18:32 app.js
You may be surprised at how big the compiled artifact is. 34k for a simple dropdown?! What’s actually happened here though is that Nim has emitted standard library functions we’ve used, e.g. for string formatting. That will only happen once. As you add more functionality, those functions are re-used, so the output size doesn’t grow at this rate!
You can also see Terser has done its job and the final artifact is only a third of the size and looks like this:
function n(n){var l=m(n.length),e=0,t=0;n:for(;e<n.length;){var a=n[e];if(a<128)l[t]=String.fromCharCode(a),e+=1;else{var u=m(0);l:e:for(;;){0;var i=a.toString(16);if(1==(null==i?0:i.length)?u.push("%0"):u.push("%"),u.push(i),e+=1,n.length<=e||n[e]<128) // and so on
If you’re size sensitive you should reduce the reliance on std libraries and bundle JS libraries instead, that you then access via FFI. For example, if I remove the strformat import and the echo statements from the app.nim module, we end up with a much smaller file:
-rw-r--r--@ 1 turbo  staff   3.0K Dec 29 23:49 app.dist.js
-rw-r--r--@ 1 turbo  staff   7.6K Dec 29 23:49 app.js
Backend
Our frontend project is now complete and we have to serve it. I’m not going to show you how to build a full MASH app, just the basics of SSR HTML that uses the component we built above.
Here’s the project structure:
.
├── backend
│   └── server.nim
├── frontend
│   ...
└── server.nimble
The nimble file will need to build the frontend first:
srcDir        = "backend"
bin           = @["server"]
backend       = "c"

requires "nim >= 2.0.0"

requires "karax#head"
requires "mummy >= 0.3.5"

before build:
  withDir "frontend":
    exec "nimble build"
We’ll also pull in mummy and karax. The backend for this is c (or any other native backend you want).
Statically including the Frontend Code
I prefer to do this, you may also choose to read it from disk or serve it from a CDN:
import std / [
  strutils,
  strformat
]

import mummy, mummy/routers
import karax / [karaxdsl, vdom, vstyles]

const appJs = "./frontend/app.dist.js".readFile
Rendering the HTML
First, let’s build the <head> section:
proc rHead(): VNode =
  buildHtml head:
    meta(charset = "UTF-8")
    meta(
      name = "viewport",
      content = @[
        "width=device-width",
        "initial-scale=1",
        "maximum-scale=1",
        "user-scalable=0",
      ].join(", ")
    )
    meta("http-equiv" = "X-UA-Compatible", content = "ie=edge")
    script(
      src = "https://cdn.jsdelivr.net/npm/[email protected]/dist/cdn.min.js",
      "defer" = ""
    )
The various meta directives are the minimum required to make sure our page renders fine on all device sizes with sensible defaults.
We also import the Alpine release. The defer attribute causes the browser to fetch the remote script immediately after parsing the <script> tag, but delay execution until after the entire HTML has been parsed. This is important for our init directives to fire deterministically. Usually boolean attributes are activated like attrib = true in karax, but since it conflicts with the built-in Nim keyword we need to use the string version.
Now let’s build the <body>:
proc rBody(): VNode =
  buildHtml body:
    tdiv("x-data" = "dropdown(true)"):
      button("x-bind" = "dropbutton"):
        text "Toggle Me"
      tdiv("x-show" = "open"):
        p: text "I'm inside!"

    verbatim &"""
      <script>
        {appJs}
      </script>
    """
A few notes:
tdivis karax’ way of avoiding conflicts with the Nim operatordivx-datais the component initializer, also passing the initial open state to our new dropdownx-bindmeans the<button>will inherit all behavior from the binding we created in Nimx-showensures the inner paragraph is only shown when theopenproperty is true (or truthy)
verbatim includes the bundled frontend code inline. Again, this is a personal preference (avoid another request), you don’t have to do this.
Now emit the entire HTML file as a string:
proc home*(): string =
  let vnode = buildHtml html(lang = "en"):
    rHead()
    rBody()

  result = "<!DOCTYPE html>\n" & $vnode
Serve it
The very last thing to do is to serve this via mummy:
proc indexHandler(request: Request) =
  var headers: HttpHeaders
  headers["Content-Type"] = "text/html; charset=utf-8"
  request.respond(200, headers, home())

var router: Router
router.get("/", indexHandler)

let server = newServer(router)
echo "Serving on http://localhost:8080"
server.serve(Port(8080))
Conclusion
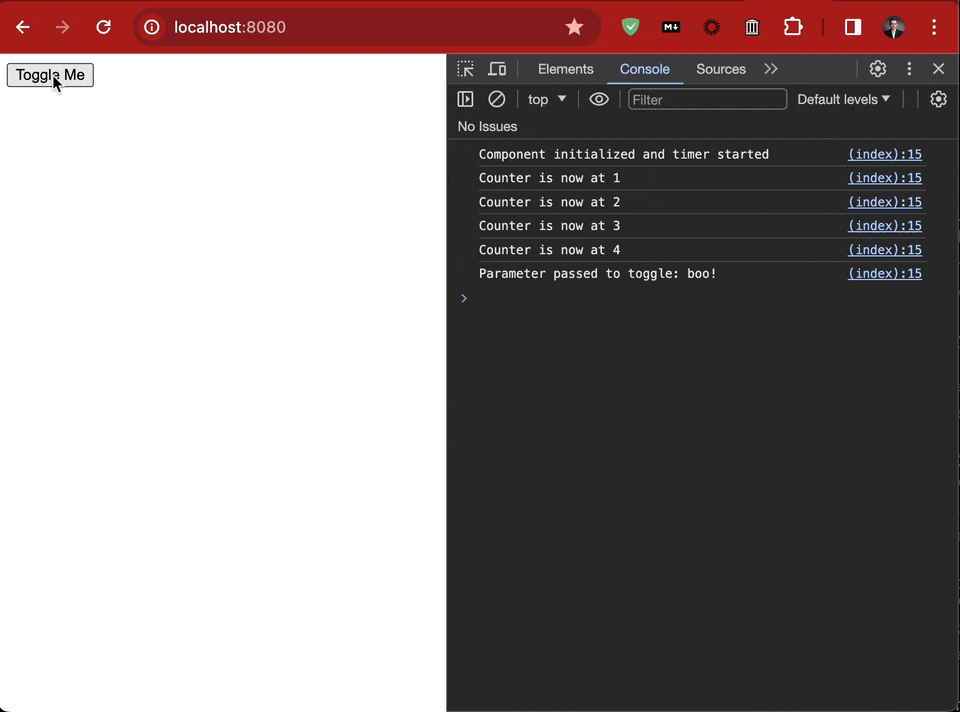
After nimble run, we can view the result at http://localhost:8080:
You can download the complete example repo here.
